18 Ways to Resolve a 100% Disk Usage on Windows 10 (2022)
Want to get rid of Windows 10 100% disk usage problem. Then you are at right place. Go through the below article to find the best possible solution to get rid of Windows 10 100% Disk usage issue.
Microsoft’s new operating system Windows 10 is getting huge fame along with its feature among the Computer’s users. Windows 10 has come with its great features which provide its user a very friendly and attractive interface. The users of Windows 10 experience usually one common issue that is its slow response time off and on.
Windows 10 has a program name Task Manager for guidance and provides you with a very worthy and huge amount of information regarding the tasks and processes currently running on your computer. In Task Manager you can monitor your disk usage among the different columns. If you see 100% usage of Disk space then it’s mean your disk usage has been maxed out and the performance of your system will be downgraded. Now you just have to take some precautionary measures which will reduce your disk usage.
Most of the users who are using Windows 10 after recent upgrade have been complaining about the slow performance of the system and Task Manager reporting the 100% disk usage.
What are the causes of 100% disk usage in Windows 10?
Most of the users of Windows 10 have been complaining about some necessary software in the system which causes Disk usage 100% and results in slowing down the performance of the system. Like Google Chrome and Skype, both utilize high disk usage on the system. Some Windows services also cause slowness of the system like Superfetch, Print Spooler, BITS, etc.
One can avoid the 100% disk usage by disabling the above-mentioned services of Windows but it may result in some consequences. Like, if disable the Spooler service, your printer will stop working until you enable it again. Also, it would not be sure that disabling any service can resolve 100% disk usage issue but for the instance, you can apply this temporary solution.
Any malware attack to your system can also create 100% disk usage problem to your machine. The basic solution to avoid 100% disk usage is that you have to spot the program or service first from Task Manager which consume high disk usage and then stop it or disable it.
100% Disk usage Symptoms in Windows 10
The first question arises in a Windows 10 user’s mind is how he can get to know that his system’s disk usage is on 100%.
- Open the Task Manager. Task Manager can be open in two ways.
- Open by tapping Alt + Ctrl + Delete keys and open Task Manager.
- Other, you can right-click the Taskbar and select Task Manager.
- In Task Manager, under Process and Performance tab, you can see disk usage reaches 100%, leading to lagging and unresponsive system. The system will go in slow performance mode until disk usage reduces from 100%.
- In addition to this, the system log has a number of events with Event ID 129, which shows resets of the disk controller.
Fixing methods of 100% Disk usage issue in Windows 10
After a complete diagnosis of the issue and monitoring it through Task Manager, here comes the solution to resolve this issue so that your system should not go into slow performance mode which can be annoying.
In this article, we will discuss the maximum number of solutions of 100% disk usage which can be fruitful to enhance the performance and working of your system when you are using Windows 10.
Following are some possible fixes of 100% disk usage problem.
- Restart your system
- Updating Windows
- Malware Check
- Disable Windows Search
- Disable Superfetch Service
- Disable Diagnostic Tracking in Windows 10
- Change in Energy Option
- Turning off Antivirus Temporarily
- Reset Virtual Memory of Windows 10
- Run Disk Check
- Change Settings of Google Chrome
- Change Settings of Skype
- Fixing StorAHCI.sys driver
- Disable Adobe Flash
- Change File Explorer Option
- Wipe SSD and Reinstall Windows 10
- Upgrade Hard Drive
- Update Device Drivers
Now we will discuss every fix step by step.
1. Restart Your System
The simplest fix for 100% disk usage is restarting your system. The Windows users may know the fact that most of the Windows issues are fixed just doing a restart to the system. 100% disk usage is no exception.
May be restarting your system wouldn’t help you, but if problem vanishes then its sufficient and simple solution for high disk usage problem.
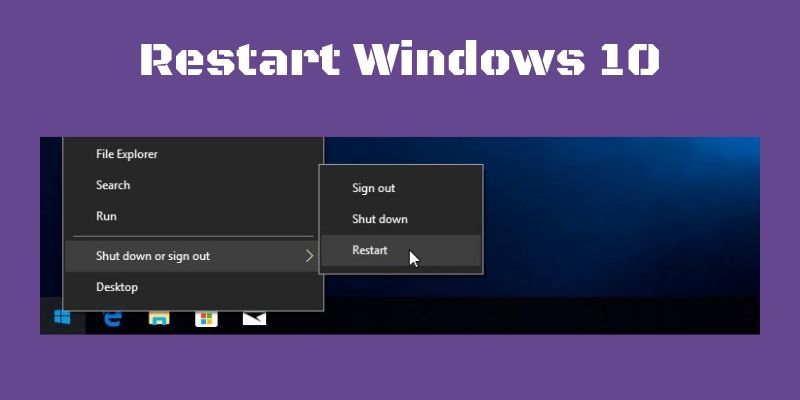
Remember to use the “Restart” option instead of using the “Shut Down” option, because “Restart” starts your computer in a fresh state.
2. Updating Windows
Another possible and simple solution for the 100% disk usage problem is that you must install the latest updates for Windows 10. Latest updates can often resolve some of the system technical problems. You can check and update Windows 10 by following these steps.
- Open the Windows Settings app.
- Go to Update & Security
- Here you can check for new updates if available and can install them.
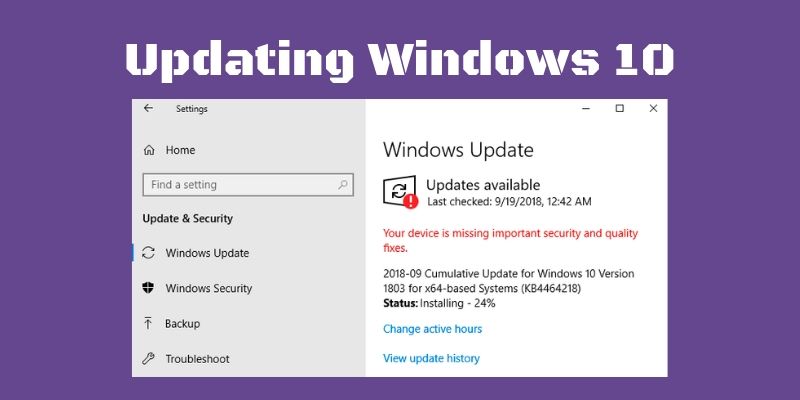
These updates may improve overall system performance along with resolving issues related hard drive.
3. Check for any Malware
Sometimes we are unaware, and some virus or malware attack on our system. This malicious effect can cause the slow performance of the system and create 100% disk usage problems. If you have any antivirus software running in the background, whether it is free or paid one, make sure it is active and able enough to detect any suspicious malware attack on your system.
Virus effect can be smart enough and can skip through the eye of antivirus software, so if you are facing high disk usage problem, then force your antivirus software to scan your hard drive for malware infect. This process may be time taking as your hard drive will go through the complete scan in such a situation where you are on the other hand facing slow performance of your system. But, you have to stay calm and let the antivirus to complete its task so that it can detect and remove the malicious files and software.
Here are some names of well-known antivirus software, which you can have in your system, like BitDefender, Avast, and AVG antivirus. Some of them have free or trial versions also and you can have the benefit of at least one time complete scan of your system without paying any penny.
4. Disable Windows Search Feature
Windows search is a built-in feature of Windows 10. This service is always running in the background and might affect the performance of the system and can cause high disk usage. Windows search enables the search files on your system. If you are not using it or you have another search app in your system, then you can disable it.
Windows search feature can be disabled temporarily as well as permanently. Disabling this feature temporarily will re-enable it on Windows restart. Also disabling this feature will stop indexing the search file on your system, but you will still have access to search files which will take longer time than usual.
Temporarily disable Windows Search
Here is the way to disable Windows Search temporarily.
1. Right click the Start Button or press Windows key + X combination keys.
2. Select Command Prompt in an admin mode.
3. Allow its user control then.
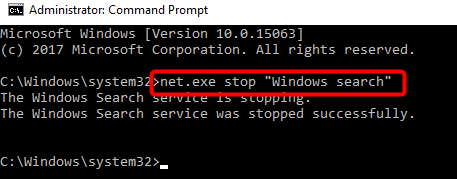
4. In Command Prompt Window type the following command.
net.exe stop “Windows search”
5. Hit Enter on your keyboard.
Now check the Task Manager and monitor is Disk usage and your system’s performance got better. If yes, then you can disable Windows Search feature permanently.
Permanently disable Windows Search
To stop Windows Search permanently, you can follow the following steps.
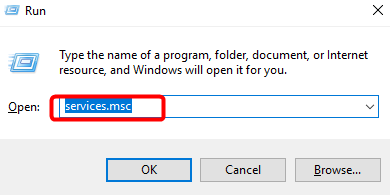
1. Press Windows key + R combination keys from your keyboard.
2. Run window will be open. Type services.msc in run prompt window.
3. Locate Windows Search option and double click on it to open its properties.
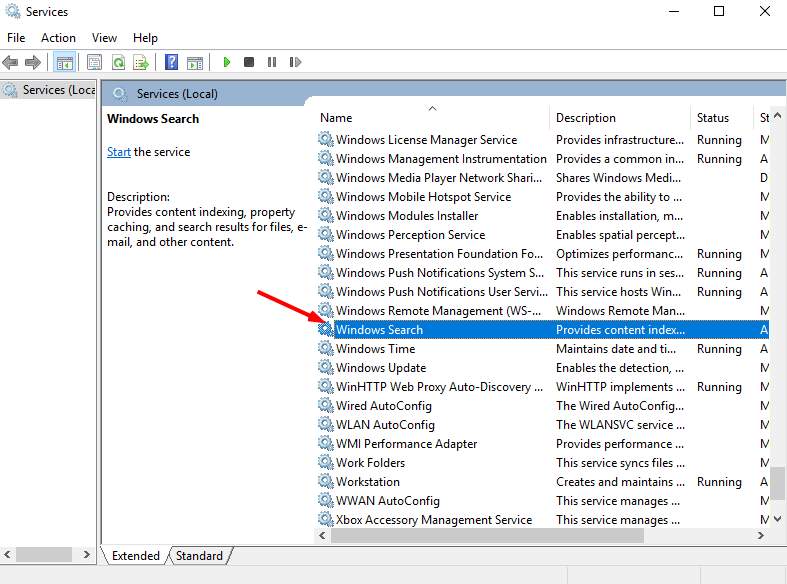
4. Change the Startup type option to Disabled.
5. Click “Apply” then “OK” to apply and save your changes.

6. You have disabled the Windows Search feature permanently.
5. Fix 100% disk usage by disabling the Superfetch Service
Supertfetch Service is responsible to lower the boot time of Windows. It also makes sure the must-load programs of Windows more efficient. But this service has been seen as a potential cause of high disk usage and cause performance issue to your system in Windows 8 and Windows 10 as well. You can also stop this feature to enhance the disk usage and performance of the system. Here is how you can stop this Windows feature.
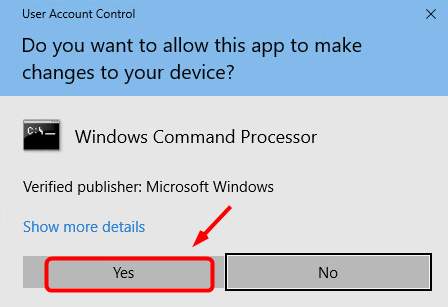
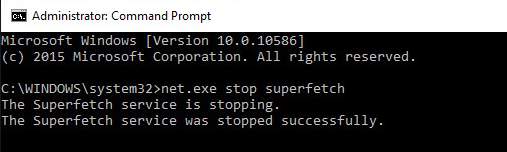
1. On keyboard press Windows key + X combination keys.
2. Then choose Command Prompt (Admin)

3. Click Yes on User Account Control
4. Once the Command Prompt displays. Type the following command:
exe stop superfetch.
5. Hit the Enter key on your keyboard.
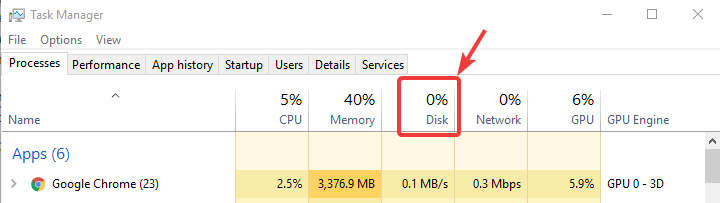
6. Wait for few minutes and monitor your system performance through Task Manager.
7. Under the Process tab see the disk usage. If it is less than 100% then you have fixed your issue.
If you are still facing 100% disk usage problem, try the next method.
6. Disabling Diagnostic Tracking in Windows 10
Diagnostic Tracking in Windows 10 has also impact on the disk usage and performance of the system. When it comes to the high disk usage of hard drive, you can disable DiagTrack Service.
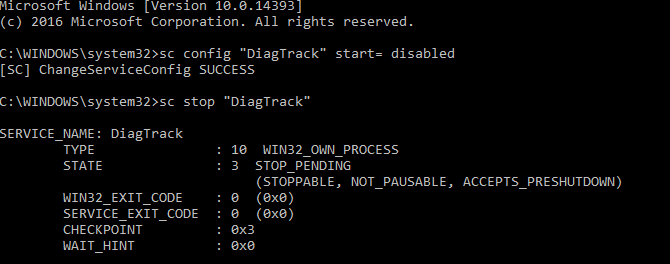
To stop this service you’ll need to access Command Prompt in admin mode.
- Click on the Start and type cmd in the search box.
- In the results, right click on Command Prompt and select Run as administrator.
- In Command Prompt window type following commands
- sc config “DiagTrack” start= disabled
- sc stop “DiagTrack”
Disable Diagnostic Tracking in Windows 10 - Also, you can go to Settings > System > Notification & actions and disable the Get tips, tricks and suggestion as you use Windows. This might improve the system’s performance.
7. Change in Energy Option
100% disk usage can also be overcome by just changing the energy option of your system from Balanced to High Performance.

This can be done by doing the following steps.
- Go to Power Option from Control Panel.
- Now go to Change Plan Settings and click on Change advanced power settings.
- From the drop down box select High Performance and make sure that all plan settings are on default.
- Now monitor the disk usage from Task Manager.
8. Turning off Antivirus Temporarily
If you have installed any antivirus software in your system then it is quite possible that due to any heavy antivirus software, your system consumes maximum disk usage. You can temporarily disable antivirus software just to check if this improves the performance of the system and decrease the disk usage.
If this solution works then you can contact the antivirus software company and see if they provide any better solution.
If the company doesn’t provide any permanent solution then you should not be worry at all. Microsoft has its own built-in antimalware Windows Defender. This will automatically enable regardless of having any other antivirus software. So if you ever disable or remove antivirus software, Windows Defender is always there to assist you.
9. Resetting Virtual Memory of Windows 10
Virtual memory of the system treats just like the RAM of the system. Virtual Memory is like extension in your RAM. When RAM memory is full enough and unable to perform a task then Windows stores files in virtual memory temporarily and when RAM creates space then Virtual memory swap those files to RAM.
However, Virtual memory may lead to 100% disk storage too. So you can reset it by following steps and reduce the disk usage below 100%.
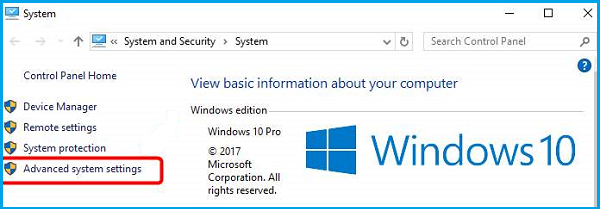
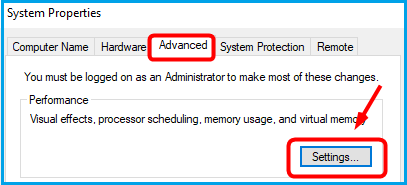
- First, you need to access “Advanced System Settings” by opening “System Properties”.
- Also, you can access “Advanced System Settings” by pressing Windows key + Pause/Break keys from your keyboard at the same time.
- Select the Advanced tab and click the “Settings” button.
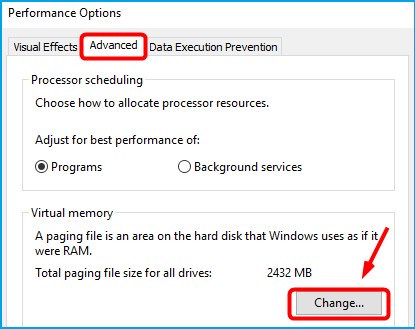
- In the “Settings” window, go to “Advanced” tab and select “Change…” in the virtual memory section.
- Make it sure that the “Automatically manage paging file size for all drives” option is not checked.

- Now select your system drive and customize the Initial size and Maximum size for your virtual memory.
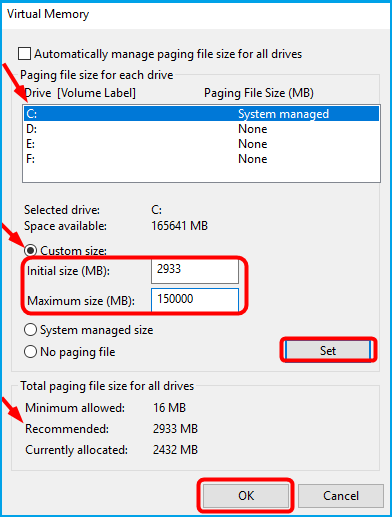
- Finally, click “Set” and then “OK” to continue.
- Initial size: This value varies with the system. If you are confused that what value you should enter, then enter the recommended value.
- Maximum size: recommended value for this field is 1.5 times the size of your physical RAM. Like, if your system has 4GB (4096 MB) RAM, the value for Maximum size option should not more than about 6144MB (4096 MB x 1.5).
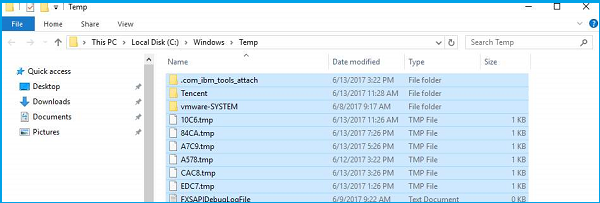
- Now you have to clear all temporary files on your PC.
- For cleaning temp files from your system, press Windows key + R keys to open Run
- Type temp in Run dialogue box and hit ENTER. This will open Windows Explorer, with your temp files.
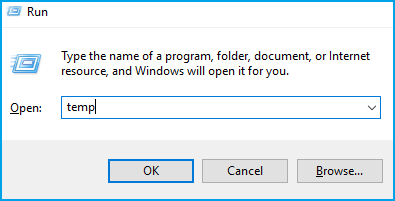
- Select all files from temp folder and delete them.
- Wait for some time and monitor the disk usage from Task Manager.
10. Run Disk Check
A very useful way to spot any kind of issue with the installation of your window or performance of your system is Disk Check, which is built-in functionality of the Windows. To do Disk Check to enhance the system’s performance and fix 100% disk usage, do the following steps.
- Press Windows key + X combination keys at the same time and open Command Prompt (Admin).
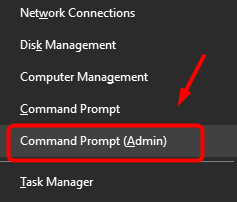
- Click Yes on the prompt window.

- Now type exe/f /r command in Command Prompt window and hit Enter.
- Now type Y to confirm the disk checking on the next restart of Windows.
- On Restart Disk Check utility will run.
- Now monitor the disk usage from Task Manager, and see if your issue has been resolved.
11. Change Settings of Google Chrome
Some Windows 10 users are facing Google Chrome browser settings causes’ 100% disk usage problem. If you are one of them, then you can fix this browser setting by doing the following steps.
Note that wordings of settings are different on different versions of chrome.
- Open your Google Chrome
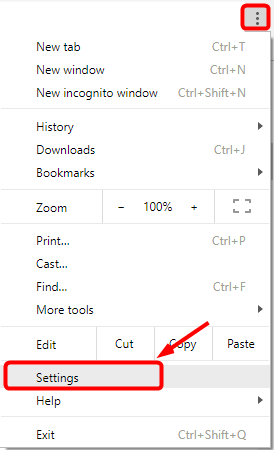
- Now click three-dot icon at the top right corner of the browser.
- Select Settings option from the drop down.
- Now scroll down the bottom of the page and click Advanced

- In the Privacy and Security section, make sure Use a prediction service to load pages more quickly option is turned off.
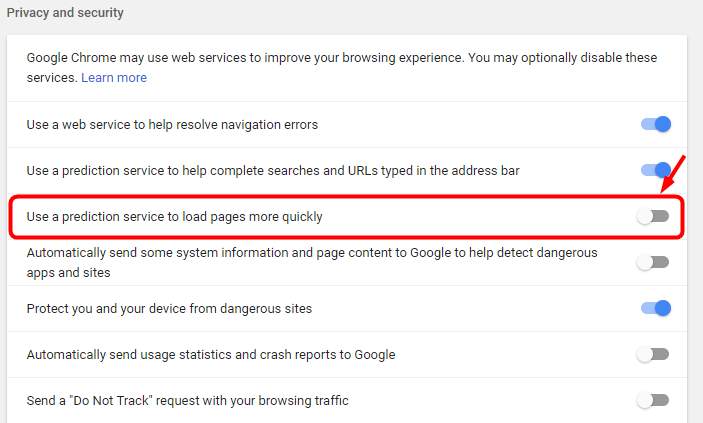
- You can also try disabling Flash in Google Chrome.
- Now monitor the Task Manager for disk usage and see if your problem resolved.
12. Change Settings of Skype
Skype software can also cause 100% disk usage of the system resulting in slowing down the system’s performance. The high disk usage comes down when ALL APPLICATION PACKAGE group has been granted with the write permission for skype.
Follow these steps to fix high disk usage issue if it is because of skype.
Note: These steps are for the desktop version of skype and not for Windows Store
- First, you have to shut down the skype.
- For this, you have to right click on the Skype icon in the taskbar and click Quit.
- Also, you can quit skype from Task Manager.
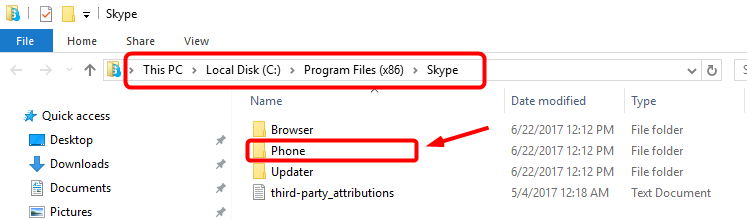
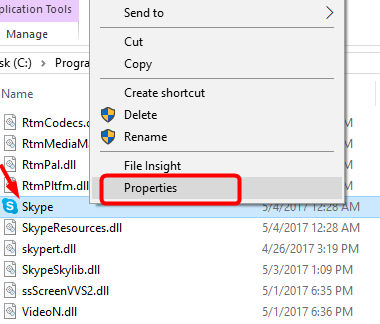
- Now open My Computer or This PC and go to C:\Program Files (x86)\Skype\Phone\
- Right click the file exe and go to Properties.
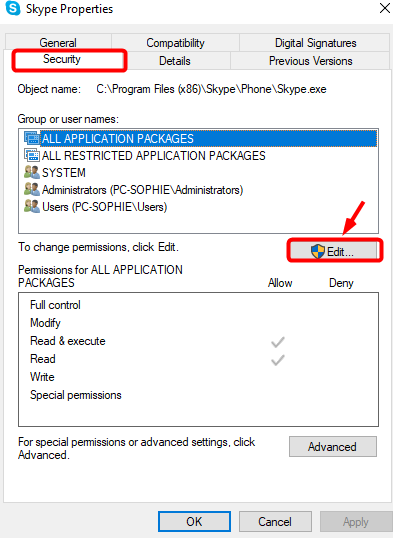
- Under the Security tab, select ALL APPLICATION PACKAGES and click Edit
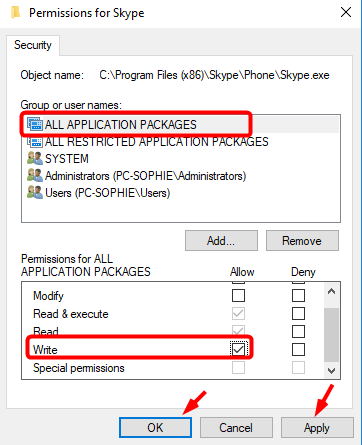
- On the next window that opens, select ALL APPLICATION PACKAGES, and check the Allow option for the write permission.
- Click OK to save and continue and then click OK to save your changes.
- After applying these changes, you can open Task Manager and monitor the disk usage and see if it reduced.
13. Fixing StorAHCI.sys driver
Another reason for the 100% disk usage is Advanced Host Controller Interface PCI-Express (AHCI PCIe) models running with the inbox StorAHCI.sys due to a firmware bug.
Following steps are for disabling Message-Signaled Interrupts support for the driver and fix the high disk usage issue.
- Press Windows key + X keys from the keyboard at the same time and open Device Manager.
- Expand the IDE ATA /ATAPI Controller category, and double-click the AHCI controller.
- Right-Click Standard SATA AHCI Controller and go to
- Under the Driver tab and click Driver If it displays C:\Windows\system32\DRIVERS\storahci.sys in the Drivers files field, then your system might be affected due to the bug.
- Now click OK and go to Details
- From the drop-down menu, select Device Instance
- Copy the value in some separate text file.
- Press Windows key + R to open run dialogue and type regedit in it.
- Go to HKEY_LOCAL_MACHINE\System\CurrentControlSet\Enum\PCI\ .
- Look for the value you have copied in a text file.
- Expand that key from the list.
- When you found the correct AHCI controller using the copied string, then navigate to: Device Parameters\Interrupt Management\MessageSignaledInterruptProperties
- Here, double-click MSISupported and change its value to 0 (means turn off the MSI).
- Click OK to save the changing.
- Now Restart your system.
14. Disable Adobe Flash
Adobe Flash has been in an extinction period. Adobe Flash has always been criticized for its loopholes and malfunctioning. It is also responsible for the 100% disk usage issue.
HTML5 has replaced the adobe flash, but some users are still using this for some of their applications run on it. If you are one of these people and facing 100% disk usage issue due to flash then you must consider uninstalling it to get rid of high usage of memory.
- Go to System
- Open Update & Security and then go to Windows Update.
- In Windows Update, go to Advanced Options.
- Now click View your update history and then go to Uninstall updates.
- From there uninstall Flash player
- Now go to Task Manager and see disk usage if it reduced or not.
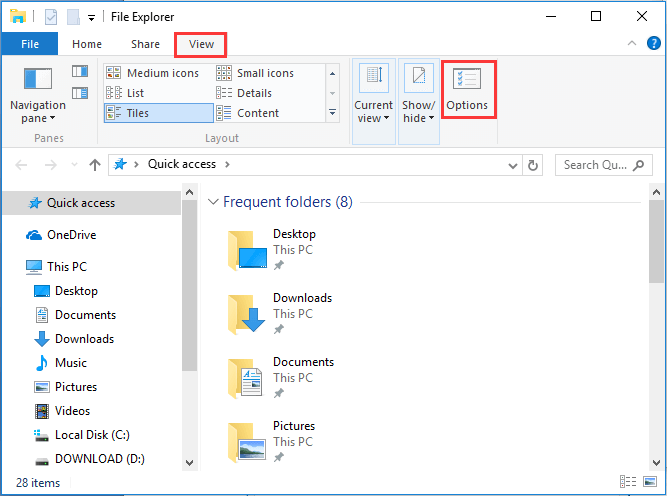
15. Change File Explorer Option
Changing the file explorer option can also beneficial for reducing the 100% disk usage. Do the following steps.
- Open File Explorer for Windows 10 and then go to “View” and click “Options”.
- Open the “Switch” tab and uncheck the following options:
- “Include compressed files (ZIP, CAB…)”
- “Always search file names and contents (this might take several minutes)”
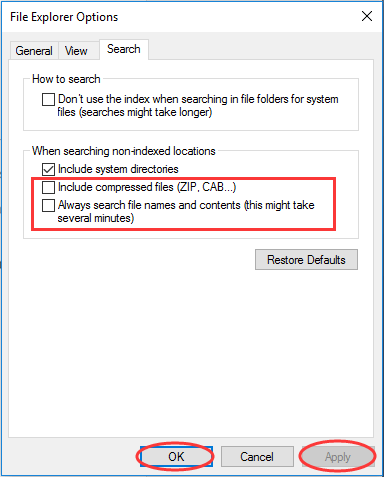
- Click Apply and then click OK to save the changes.
- This might also reduce the disk usage problem and enhance the system’s performance.
16. Wipe SSD and Reinstall Windows 10
If above all mentioned methods and fixes do not resolve the high disk usage issue then for the last resort you should wipe the hard drive and reinstall Windows 10. Before this, you should take a clean backup and do a proper Windows installation.
First, you have to backup SSD. For this, you will need a hard drive. By backing up, on one hand, your data will be safeguarded and on the other hand, if reinstallation of Windows doesn’t resolve the issue then you do have a chance to return to your previous Windows and ignore the troublesome system settings and application installations.
You can use MiniTool Partition Wizard free to do this job.
- When you launched MiniTool Partition Wizard, select the system disk as the source disk and choose “Copy Disk” from the menu.
- Choose an external hard disk as the target disk. It should be known that all data on the target disk will be erased for a successful clone.
- On the next page on MiniTool Partition Wizard, you will see many copy options listed there.
- Select the desired options you need and continue.
- When you see the “how to boot from the new disk” message, read it carefully and click
- Finally, click “Apply” to start copying the whole drive.
After doing the above steps, now you are ready to reinstall Windows 10.
17. Upgrade Hard Drive
Sometimes hard drive develops many bad sectors in it which send your system to loop with high disk usage. Else, your hard drive might be too old to perform accurately, even it has enough unused space, but it works very slow and reduces the performance.
If this happens, it is time to upgrade your hard drive. The EaseUS Partition Master is the software which can help you to replace your hard drive with a new one without taking too much time.
Connect the new hard drive to your system (If it is a new hard disk, please initialize it to MBR disk.).
- Select the source disk.
- Open The EaseUS Partition Master, right-click the disk that you want to copy or clone. Then select “Clone”.
- Select the target disk and then choose wanted HDD/SSD as your destination.
- View the disk layout. You can preview the disk layout and edit the target disk partition Then click “OK” to continue.
- Execute the operation. Click the “Execute the operation” option and click “Apply” to start the disk cloning process.
18. Update Device Drivers
Other than all fixes describe above, there is one more fix which you can apply to resolve the 100% disk usage issue and upgrade your computer’s performance. That fix is you might consider upgrading your device driver.
You can upgrade the device driver smoothly with the latest version of Driver Easy. This software will automatically get your system and find suitable and correct drivers for your system. Follow these steps to upgrade device drivers.
- Download and install Driver Easy.
- Open Driver Easy and click Scan Now This will start scanning for drivers and detect if any problem with driver found.
- Now if any driver got flagged in result then click Upgrade button in front of that highlighted driver.
- Else you click Upgrade All option to download and install all the flagged drivers automatically.
- After doing these steps, go to Task Manager and examine is your disk usage got reduced and if it’s below 100% then you have fixed the high disk usage problem.
Frequently Asked Questions:
Is 100 disk usage bad?
If your hard drive is working on 100% disk usage then it may slow down the performance of your PC and decrease the response rate of the system. As a result, your system will not do its tasks properly and faster and eventually, you’ll get annoyed. Hence, If you examine that your system is on “100% disk usage” mode then you should find the cause and take proper action to resolve this issue.
Why is my disk usage at 100?
If your system is on 100% disk usage state and your system performance is hell slow, then you should fix this issue ASAP. You must follow the proper procedure to tackle this nasty situation. Type Task Manager in the Windows search bar and open it. Under the Process tab see which program or application is causing your hard disk 100% usage.
Will SSD fix 100 disk usage?
Normally, your system doesn’t use 100% of its disk usage. But if you face this issue and couldn’t fix it by applying the described solutions then most probably it’s the malfunctioning of your hard drive. May be your hard drive is getting old and now it is time to replace t with the new one.
What is disk usage?
Disk usage (DU) is the portion of your system’s storage that is currently in use. It expands or contracts with the disk capacity, which is the total amount of space that a given disk is able to store.
Why is disk usage so high?
Everything that can’t be accommodating on the system’s memory is directed towards the hard disk. That’s mean your Windows is using your hard disk as a secondary memory device temporarily. If you have a huge amount of data that has to be written on the disk, that creates high disk usage issue and your system will slow down in performance.
What is disk usage in Task Manager?
When you open Task Manager, under the Performance tab there is a column name Disk, which shows the percentage of current disk usage. This percentage is referred to the disk activity time i.e. disk read and write time.
Does SSD improve disk usage?
Yes, improving SSD size in your system does affect the disk usage and decrease it. In your computer system when you run a program, the program takes HDD data into the RAM i.e. store processed data into the RAM. Actually, SSD doesn’t reduce the disk usage, it only increases the response rate at which disk is used that is read or write.
Will increasing RAM improve disk usage?
Increasing the size of RAM doesn’t decrease the disk usage. You should have a minimum of 4 GB of RAM in your computer. You can upgrade your RAM from 4 GB (minimum) and along with it purchase an eternal SSD/HDD with minimum 7200 RPM. By this, your boot system will become faster and disk usage will be decreased.
How do I check disk usage?
Checking disk usage space from Linux Commands:
df command – this command displays the disk space amount that is used and available on Linux file system
du command – this command shows the amount of disk space that is used by the specified files and for every subdirectory individually.
btrfs fi df /device/ – this command shows the disk space usage information for a btrfs based mount point/file system
What is Steam disk usage?
Disk usage goes to the high level only when steam is unpacking or writing files. What I have observed that steam doesn’t utilize disk until it downloads an essential amount of game files. When it starts unpacking those files then disk usage increased, otherwise it remains low.
How do I see disk usage on Windows?
View disk usage space in Windows 10
- Press “Alt+Ctrl+Delete” combination of keys from the keyboard.
- Open Task Manager from the results.
- Open up the Performance tab from Task Manager
- Under the Performance tab, there will be a column name
- Here in this column heading, you can see the disk usage.
Conclusion
To run your system smoothly without slowing down performance, your disk usage must be below 100%. And if you are facing this performance issue you can apply any of the above methods or all above methods to get rid of Windows 10 100% disk usage. These are all possible fixes which a user can apply for the Windows 10 100% disk usage problem.
If you are still facing the high disk usage problem after applying above fixes, then you must consult the technical person who will diagnose the actual issue with your system and create a fix to your system.